Home 2.0 Blog Archive

Thursday, August 31, 2017

MARKS IN ACTION

Mark-Ups to Built Work

One of the advantages that I have as an architect-developer with regards to quality control over my projects is that while other architects are rarely (if ever) on site during construction, I am on site everyday to address any questions or concerns that come up during the construction process. An example of this happened a couple days ago when I noticed a slight variation from the as-built condition and the drawings relating to the front porch roof, which required some minor alterations to the detailing to finish out correctly. To get in front of this I issued a simple photo mark-up (below) of what needed to happen to get everything to align properly the night before construction on that portion of the structure started, and it was built out per that mark-up yesterday to great results.

Wednesday, August 30, 2017

PORCH PROGRESS

Front Porch Post & Beam Installed

On Tuesday the framing crew was back on the Oakley Home 2.0 lot to begin working on building out the front porch structure beneath the walkout roof deck. The day ended with the 6x6 post, double 2x10 roof support beam, and floor joist all set in place. Photos of the action below.

Monday, August 28, 2017

FRONT SIDING

Front Elevation Siding Started

The cladding crew was back at it again on Monday finishing off the side elevations by cutting the fiber cement board to fit around the numerous vents at the base of the home. Once that was complete, they moved onto the front face of the house. While additional framing around the yet-to-be-installed porch beam and column will be needed for the last of the siding work to be put in place, the progress does give a nice preview of what the finished product will look like. 

Saturday, August 26, 2017

MORE VOIDS FILLED

Interior Garage Wall Separation

Insulation work continued on Friday with rigid insulation being cut to fill the voids between the joists above the wall separating the garage from the first floor hallway. Once the rigid was placed, foam sealant was sprayed around the perimeter to ensure a complete seal of the cavity. Images of the finished result and materials utilized are shown below.

Friday, August 25, 2017

FLASH & BATT

Rim Joist Spray & Batt Insulation

With the exterior stud wall cavity insulation sufficiently placed per LEED recommendations earlier in the week, the focus shifted Thursday to insulating the first floor rim joists with the 'flash & batt' system, which is 1" of spray foam followed by a layer fiberglass batts to both seal and insulate the cavity, which can otherwise be a source of significant thermal transfer.

Thursday, August 24, 2017

BACK SIDING

Rear Fiber Cement Lap Siding & Trim Work

After taking Tuesday off due to the stormy weather moving through the tri-state, the siding crew was back to work on Wednesday getting the rear building elevation clad in fiber cement siding and trim. They also wrapped the rake board in aluminum trim with the first runs of sloped soffit board installed on the underside of the overhang. One detail to point out is the custom profile of the rake trim, which was site fabricated to give the gable end some additional visual interest.

Wednesday, August 23, 2017

R-32

Double Wall Insulation

One of the key checkpoints for a LEED Certified home is the post-insulation inspection by a third party LEED for Homes Green Rater to ensure optimal building envelope performance from a thermal insulation and air sealing perspective. This inspection took place last week at the Oakley Home 2.0 project and among the recommendations for improved energy performance was adding a 2nd layer of R-13 batt insulation for the 2x4 'fake' stud walls designed to conceal ducts and piping in front of the 2x6 stud walls that are already filled with R-19 insulation. This will eliminate any possible air movement in the cavity with the added benefit being that much of the exterior walls now will have R-32 insulated walls, which is approximately double what even LEED requires, meaning better energy performance and lower energy bills for the future homeowner.

Tuesday, August 22, 2017

SOFFIT WORK STARTED

Vented Aluminum Soffit & Trim Installation

As siding work resumed on Monday and progressed towards the roof line, the first of the aluminum vented soffit pieces were put in place alongside the matching aluminum trim wrapped fascia boards. Below are a couple images of that material and installation.

Sunday, August 20, 2017

RENDERING REFRESH

Updated Interior Rendering Gallery

As selections have been made related to cabinetry, countertops and various other finishes throughout the Oakley Home 2.0 project at 3874 Isabella, I wanted to make sure that the renderings posted to the Oakley Home 2.0 Website, Zillow and Houzz were updated to reflect the most current representation of what is being built. This new batch of renderings is shown below. 
Above: Kitchen with Updated Layout and Selections for Cabinets & Countertops
Above: Living and Dining Area with Updated Interior Trim Colors
Above: 2nd Floor Hall with Updated Nook Design

Saturday, August 19, 2017

TRIMPROVEMENT

Improved Door Trim Detailing

One of the reasons that I love being an architect is because it is a profession that works at many different scales. From scales as large as master planning efforts for schools and neighborhoods, all the way down to the small details of trim and flashing. This particular blog post deals with the small scale as it relates to exterior door trim details and lessons learned from the Starter Home 2.0 project in Pleasant Ridge. Whereas the Pleasant Ridge home exterior doors were installed with the standard casing trim that comes with the door, I learned that those casing pieces are intended to be removable, allowing for the doors to be trimmed with 1x4 board matching the window and corner trim. Not only does this provide a cleaner, more consistent look, but it also makes in much easier to flash above the trim to shed water, which is shown installed in the bottom image. 

Friday, August 18, 2017

SIDING STARTED

Fiber Cement Board Lap Siding Install

Thursday the siding contractors made their first appearance on site and got to work on installing the fiber cement lap siding and trim around the home. Below are some images of the work completed after a rain shortened day 1.

Thursday, August 17, 2017

THE FUTURE OF VIRTUAL HOME TOURS?

Interactive Walkthrough Videos

Recently for my job at SHP Leading Design, we experimented with a new type of 360 degree camera we purchased as a way to better capture the user experience of walking through the buildings we design. Below is an example of this interactive video we produced for the new Fairfield Freshman school that allows the viewer to look around in all directions while moving through the building. I can't help but think this is the future of virtual home tours and can definitely see this being a part of future Home 2.0 marketing efforts.

Wednesday, August 16, 2017

THE LITTLE WINDOW

Basement Slider Window Installed

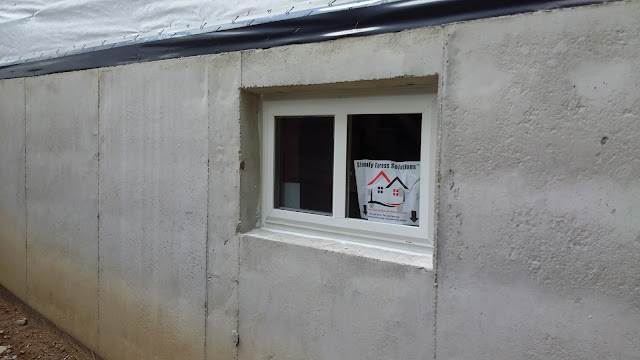
On the opposite end of the size spectrum as the 'big door' that was installed on Monday in the main living area. Tuesday was the day the 'little window' in the basement hallway was put in place, meaning all windows have now been installed in the Oakley Home 2.0. Though small in size, the basement window located high on the wall does a really effective job of flooding the hallway space with natural light in a way that is consistent with all of the other primary living spaces throughout the house. A little detail that makes a big difference.

Tuesday, August 15, 2017

THE BIG DOOR

4-Panel Sliding Door Installation

Monday was a milestone day at the Oakley Home 2.0 project with the big 12'-0" wide by 8'-0" high 4-Panel Sliding Glass door being installed. This signature design feature will ultimately open out onto the rear deck, which is now under construction with the first ledger boards having been lifted into place.

Monday, August 14, 2017

MARK-UP ARTIST

The Art of PDF Mark-Ups

Being a highly visual person, one of the best ways for me to understand and communicate ideas is through images. I have found PDF mark-up software (whether Adobe Acrobat or Bluebeam) to be an especially effective tool in producing quick and clear visuals throughout the design and construction process, and this was very much on display this past weekend when verifying material take-offs, and clarifying a couple different construction conditions. Below are a few examples of my PDF mark-up artistry.

Sunday, August 13, 2017

WHAT I LOVE ABOUT THE HOME

Zillow Listing Update

One of the items Zillow requests of owners listing homes for sale on their site is a description of 'What I Love About the Home'. Here is what I wrote for the Oakley Home 2.0 @ 3874 Isabella:
WHAT I LOVE ABOUT THE HOME
The combination of modern living amenities and a location just steps from Oakley Square in one of Cincinnati's most established, walkable neighborhoods makes this new construction LEED green home easy to fall in love with. Custom designed for this specific lot, this 4 bedroom, 3-½ bathroom home features an open plan layout with 9' ceilings, dynamic indoor/outdoor living spaces on all three levels, a master suite, and quality finishes throughout such as hardwood floors, quartz countertops, and floor-to-ceiling ceramic wall tile.

Saturday, August 12, 2017

INSULATION UNDERWAY

Wall and Garage Ceiling Batts Installed

Friday at the Oakley Home 2.0 site, the insulation contractor was on site installing insulation batts in between the exterior stud walls and in between the floor joists below the second floor above the garage. Cardboard was also cut and installed to fit between the roof trusses above the exterior walls to hold back the blown insulation in the attic while maintaining ventilation in the air space above.

Friday, August 11, 2017

SEALED AND STOCKED

Air Sealant, Fire Foam & Drywall Delivery

Thursday was another active day at the Isabella lot with all the gaps between framing members and around openings in the exterior walls being sealed to prevent air leakage, as well as all penetrations between floors for pipes, ducts and electrical runs being sprayed with foam firestopping as required per fire code to prevent the spread of flames up the walls. Drywall material was also delivered to the home so that the installers have everything they need to get started on that work next week once the insulation has been installed.

Thursday, August 10, 2017

KITCHEN TWEAKS

Cabinet & Appliance Adjustments

As I've been working through finalizing the kitchen design the past few weeks, a few minor adjustments to the layout have been made to improve the aesthetics and function of the space. These tweaks are as follows and marked in the rendering below.

  • Relocating the microwave from above the range to next to the fridge.
  • Adding a range hood above the range.
  • Providing paneling matching the cabinets to wrap around the low wall.

Wednesday, August 9, 2017

WATER IN & WASTE WATER OUT

Sewer, Water & Downspout Connections made

Throughout the day on Tuesday, underground utility work continued at the Oakley Home 2.0 property with work performed on the Sewer Line, Water Supply Line, and Downspout Piping.
Sewer Line Work: The underground sewer line running out of the house was connected to the sanitary sewer lateral at the street with a cleanout provided in the front yard. 
Water Supply Line Work: The water supply line was tapped at the main near the street, which runs to the water meter pit in the front yard prior, which then runs into the house where the main shutoff valve is located on the interior side of the basement foundation wall.
Downspout Connection Work: The downspouts collecting storm water off of the roofs were piped underground and connected into the main storm sewer at the street. A cleanout for the the downspout piping was also installed.
The last underground utility to be installed is the gas line, which will take place at a later date to be determined.